Wednesday, December 19, 2018

Save money and harvest your Zinnia seeds!

Wall of spent Zinnias
After years of forking out cash for Zinnia seed packets at the local garden center, I decided to harvest my own.   This was a surprisingly simple process, and the number and quality of seeds harvested from the seed heads was impressive!
Zinnia seed head ready for harvesting

Starting in late fall or any time in the winter, cut off the seed heads of the flowers a few inches from the base of the flower.   Collect as many heads as possible in a paper bag to allow any residual moisture to escape.


Next, spread the heads out onto some newspaper and allow them to completely dry out for a week or so. 


Do the Twist: Separating seeds from the head
Take each head in your hand and gently but firmly twist the lower half of the seed head.  The seeds, which resemble arrowheads, will unwind and fall out.  Each head may produce 100's of seeds.   

Store your stash in a paper bag labeled with the month and year you picked them.

Fine pile of seeds
To "proof" or test the germination rate of your seeds, wrap a few in a damp paper towel and place inside of a zip-lok bag.   Place in a warm area.  In a few days. check to see how many sprouts have formed.  This will give you an idea of germination rate.    These seeds make nice gifts for friends and neighbors - put them in little paper envelopes with a fancy label.   To sow in early spring, just scratch a line about 1/2" deep and generous thread a line of seeds into the crease.     The time invested will result in a nice, tall colorful set of free blooms that last for months come early summer.  Enjoy your harvest!


Friday, September 22, 2017

Easy Fresh Homemade Apple Cider - No Fancy Press Needed

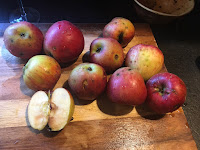
apples on cutting board
It's cider season!  With a few mature apple trees out back I've developed a method for making fresh cider (apple juice really, as cider is fermented technically) that is easy to make

and produces a fresh and delicious drink.    This recipe produces a crisp cider that tastes exactly like the fresh, unpasteurized kind you get at a local orchard.


You will need the following:
  1. Apples - 40 will produce about a gallon - size/kind/shape doesn't really matter as long as most of it is still edible!
  2. Fine cheesecloth or clean cotton undershirt for straining
  3. Large collection bowl to collect juice
  4. Funnel
  5. Knife for slicing apples
  6. Rubber Spatula for scraping down the processor
  7. Storage container for cider - a glass jug or re-purposed plastic milk containers work well
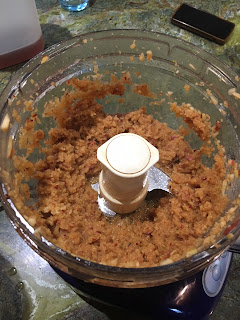
apple mash food processorWash the apples and cut them into quarters.   I poke of any remaining stems and cut off the really bad parts.   No need to core or peel.  

Place these into your food processor.  My processor handles about 5-6 apples at a time.    Process the apples for about 30 seconds, open the processor lid and push down all the bits that have climbed up the side with a spatula - you will do this once or twice per juicing batch.   Turn the processor back on until you have a thin paste.  The mash will churn at the edges of your processor - this means it is ready to press.

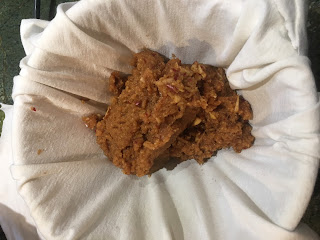
apple mash collection bowl
Dump the mash into the cloth that you have placed over the collection bowl as shown to left.
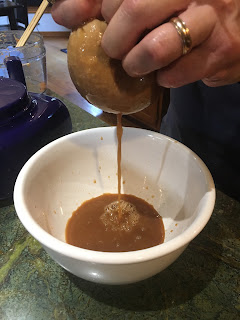
squeezing cider into bowl
Slowly lift the cotton fabric and squeeze the juice out of the pulp.   Gradually start wringing out and applying more pressure to get as much juice as possible.   Hint:  for the next cycle, "walk" the center of the pulp about 6 inches away from the previous center as the fabric may break if it used only in one spot!

A good "yield" for a single apple is about 3 oz of juice if you really put some elbow grease into it!
homemade cider jug
Use the funnel to add the juice into the storage container.   Refrigerate to prolong the shelf life of your fresh juice.

Enjoy!

Hints for acquiring apples:

Many folks who have apple trees in suburbia are willing to give you as many as you can pick because they don't like the "mess" of the fallen apples and all the critters they attract.  

These suburban orchards go unpicked too because the apples may have spots or holes that are easily cut out for making cider or for baking.

Tuesday, May 30, 2017

New Graduates - Mind Your Financial Health

As is now the season of caps and gowns, here is some financial advice, gathered from over 30 years of investing and life experience, for the recent graduate.  


Your financial status is more important than your social media one!   Things like job offers, how much you pay for a car loan, home or car insurance and your mortgage rate are just some of the things determined by your credit score.   Thinking of being financially independent and being able to retire at a reasonably young age?  Better start saving now, the old adage of "pay yourself first" is very true!
  1. If you are offered a 401(k) plan at work, make sure you are contributing at least as what will be matched by your employer.   Preferably you want to contribute at least 10% of your pre-tax income and try to build from there.  If this is too much of a stretch financially, then go for at least the match.  Yes, there *is* such a thing as free money 😉
  2. Open up a Roth IRA and max it out - your earnings will be TAX FREE - yep - tax free for life.  That can add up to tens of thousands of dollars of tax savings on top of the earnings that your contributions will make.  If you can't hit the max, don't worry, invest what you can and watch it grow.
  3. Enroll in a High Deductible Health Insurance plan and set up an Health Savings Account (HSA) account if your employer offers it.   Compare all plans offered, if you are in reasonable health, a plan with higher deductibles that you can pay with before tax income will often make a lot more sense financially.   These savings can also be invested as they accrue and can be used to pay for medical related expenses for yourself or any of your dependents (as determined by who you claim on your taxes). Finally, once you turn 65, they become a "stealth" IRA and can be used for any purpose and are taxed as ordinary income.
  4. Implement the couch potato method for investing - use low-cost Exchange Traded Funds (ETF) that are based on market indices (Vanguard and Fidelity have excellent ones) and base your investments on an Asset Allocation model based on your age and risk tolerance (hint: you're young be more aggressive!)  Great article here:  https://assetbuilder.com/knowledge-center/articles/how-to-build-couch-potato-portfolios-with-exchange-traded-funds
  5. You are an adult now, pay your damn bills on time!    Here's a great way to make sure you will pay your bills on time - enroll in an auto-pay plans.  This is especially important for your credit cards - like Visa or MasterCard as they make a lot of money from late fees and paying late will negatively effect your credit score.    Do this too with utilities - you may have to send in a voided check - but once it is set, you can forget about it- just make sure you have the funds in your checking account to cover this. But hey, you're a college graduate making the big buck now!
  6. Check your credit score for free once a year here:  https://www.annualcreditreport.com/index.action and take steps to make sure anything that is misreported is fixed.
  7. Look at any recurring fees or subscriptions that you pay regularly.  With just a little time spent you may find out that for but don't really need or use them.  This could include gym membership, magazine or on-line services.    For example, I had a membership to Automobile Association of America (AAA) as my cars are getting older, but it turns out my Fidelity Rewards card has a reduced, pay as you need it auto service that I can use for $60-$70 per incident.  These service providers are often the same that AAA uses.   I cancelled the AAA plan, saving me almost $80 / year.
  8. Choose insurance plans - auto, home or apartment - with higher deductibles (like $1,000 to $10,000 that you have to pay before the policy kicks in). Compare these rates - which are usually not in favor of the company or agent selling them so tend not to be brought up as options.   These can save you a lot of money over the course of your lifetime. 
  9. Make your credit card earn money for you!   Shop around and choose a card that offers you cash rewards - not points for loyalty.  Cash is King!  Fidelity offers a 2% cash back card on ALL purchases that I've used for years.  Just make sure you pay your balance in full on time (see #5)  https://www.fidelity.com/cash-management/visa-signature-card   Use it in lieu of any private, store issued cards and watch the money come in every quarter to your Fidelity Cash Management / Brokerage account.
  10. Buy a used car.   A new car is one of the worst investments you can make - aside say from a time share.  The moment you drive it off the lot, you've lost about 20% of your investment.   There are a glut of mid-size sedans out there that are one to three years old - consider one of these before committing yourself to 3-5 years of high, monthly payments for a new car.

Tuesday, January 3, 2017

Costco Take and Bake Pizza - Perfecting the Pizzeria Style

Costco Pizza is quite the tasty bargain.  It weighs nearly 3 pounds - and is loaded with tons of mozzarella cheese (sauce lovers may say too much - nah!). For around $9, it can satisfy a family of four to five well within budget!

I've found that following the stock cooking instructions leave a pizza that tastes good, but not great.   The edges are fine, but the middle tends to be gooey and under done.

Try a few simple tips described below to approximate the taste of a pizzeria style pizza - tasty caramelized cheesy top with a crunchy edge.

Step 1 - Let the Peel be with You

Making sure one rack is at the top most position, preheat the oven to 400 degrees.

Using the round cardboard that is packed beneath the pizza as a peel, position the pizza at the center of the top rack.  No need for a pan or pizza stone.   Don't throw away the cardboard bottom yet.  Bake for about 14 minutes.

Step 2 - When the Heat Comes Down

After about 14 minutes, the bulk of the pizza will have finished cooking - the bottom crust and edges are just about done, but the middle is just pale and melted.

Turn the bake feature off and turn on the top broiler.  Set the timer to one minute - DO THIS - you do not want to be distracted and turn your family's dinner into a round smoking mess!

When the timer completes, check the pizza, you'll most likely need at least one more minute to achieve a nice caramelized top.   When finished to your liking, turn the oven off.

Step 3 - Time to Enjoy

Remember the cardboard peel in Step 1 that you saved?   Use this again, with oven mitts to remove the pizza.  The cardboard also makes it easy to cut and serve.  Set on a table and wait at least 5 minutes before cutting.     This is to harden the cheese a bit and to prevent your kids from searing off their young palettes.

Serve with something green  - like a side salad - and you can all pretend that it's healthy.   Bon Appetit !

- Daddio